PointRCNN环境搭建及部署
算法地址:PointRCNN
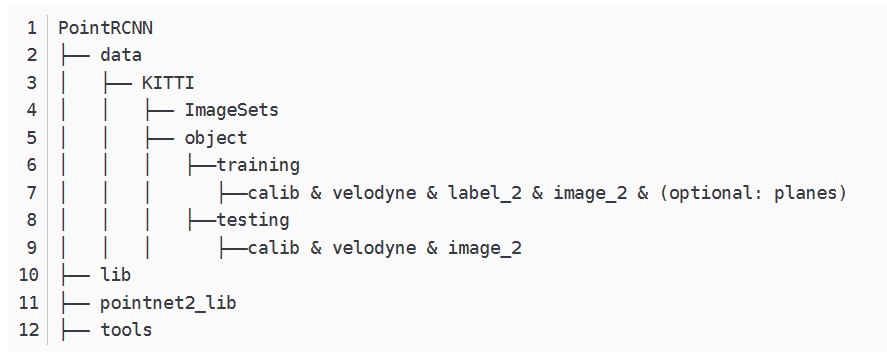
1.数据集(KITTI)准备
官网地址:KITTI数据集官网
数据集结构
2.环境部署
a.环境概览
1 | |
b.创建虚拟环境并激活
1 | |
下载源代码:
1 | |
c.安装cuda10.0
具体参考我这篇博客 Yolov4算法部署及环境搭建(服务器上)
在安装老版本的cuda时,会有一些注意事项(特别时安装时的一些注意事项)
1 | |
d.安装pytorch1.0.0并配置依赖环境
1 | |
在运行最后一步时可能会出现如下报错:
1 | |
解决问题的方法有如下可以参考:
1).增加清华源
1 | |
并未解决
2).手动安装,将torch和torchvision分别安装。
1 | |
e.安装gcc(7.2.0)
gcc各版本下载: http://ftp.gnu.org/gnu/gcc/
1 | |
不出意料,编译会出现很多问题,如下:
1).sanitizer_platform_limits_posix.cc:158:23: 致命错误: sys/ustat.h:没有那个文件或目录
1 | |
解决:
首先将gcc-7.2.0/libsanitizer/sanitizer_common/sanitizer_platform_limits_posix.cc中的这一行#include <sys/ustat.h>中注释或者删除。
大约在250行左右插入。
1
2
3
4
5
6
7
8
9
10
11
12
13// Use pre-computed size of struct ustat to avoid <sys/ustat.h> which
// has been removed from glibc 2.28.
#if defined(__aarch64__) || defined(__s390x__) || defined (__mips64) \
|| defined(__powerpc64__) || defined(__arch64__) || defined(__sparcv9) \
|| defined(__x86_64__)
#define SIZEOF_STRUCT_USTAT 32
#elif defined(__arm__) || defined(__i386__) || defined(__mips__) \
|| defined(__powerpc__) || defined(__s390__)
#define SIZEOF_STRUCT_USTAT 20
#else
#error Unknown size of struct ustat
#endif
unsigned struct_ustat_sz = SIZEOF_STRUCT_USTAT;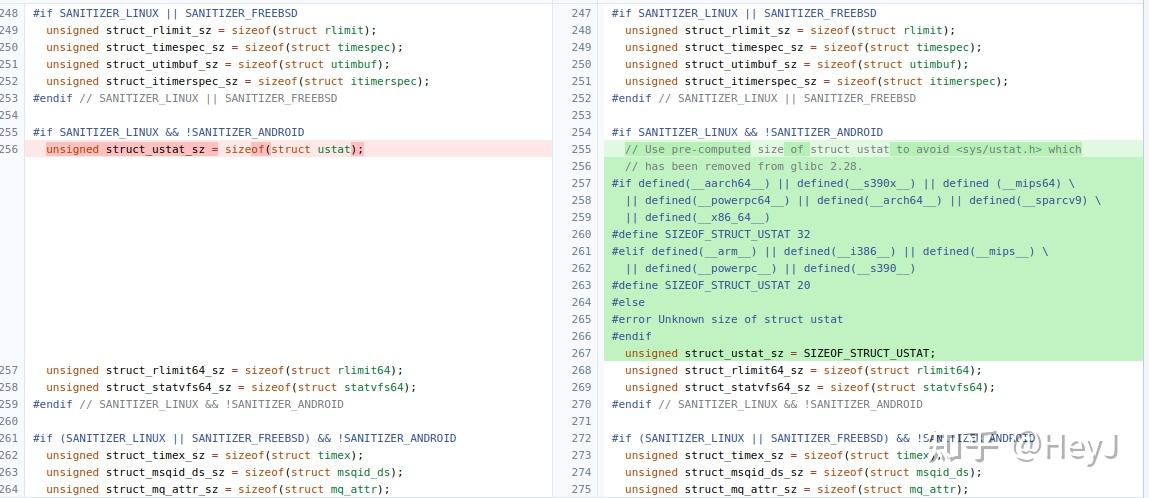
2).
1 | |
我们需要根据这个补丁改一下gcc7.2.0的代码:gcc: Fix error 'size of array is negative' (#16968) · spack/spack@6fb6b28 (github.com)
3).其他问题参考(本人没遇到)
ubuntu 20.04LST跌跌撞撞安装编译gcc6.3.0_狂躁脑电波的博客-CSDN博客
编译成功后,配置环境变量:
1 | |
f.安装依赖pointnet2,iou3d,roipool3d
1 | |
参考:
PointRCNN环境搭建及部署
https://collapsarva.github.io/2023/11/12/PointRCNN环境搭建及部署/